
U-Channel vs. Clips: Securing Shower Glass Panels
A fixed glass shower panel may look weightless, but its mounting hardware carries every movement, bump, and daily use. The choice between a U-channel and clips affects the panel's stability, appearance, cleaning routine, and installation requirements.
Both systems can secure frameless glass when a professional selects the right hardware and anchors it into a sound surface. The better choice depends on your shower layout, wall conditions, glass size, and preferred look. Understanding the difference will help you plan a safer, cleaner shower panel installation .
Key Takeaways
- U-channels support the glass along a longer edge and can help distribute pressure.
- Clips create a lighter, more open appearance but require accurate placement and strong anchoring.
- Neither system should rely on silicone alone to hold a large fixed panel.
- Wall framing, tile condition, panel size, and hardware placement matter as much as the mounting style.
- Professional measurements reduce movement, leaks, stress, and alignment problems.
How Fixed Shower Panels Stay in Place
A fixed shower panel is a stationary sheet of safety glass that separates the wet area from the rest of the bathroom. It may sit beside a shower entrance, protect a vanity from spray, or connect with a glass door in a larger enclosure.
The panel doesn't hold itself in position. Installers secure it with metal hardware attached to the wall, floor, curb, or another properly supported surface. The hardware includes soft gaskets or setting blocks that cushion the glass and prevent direct contact with metal or tile.
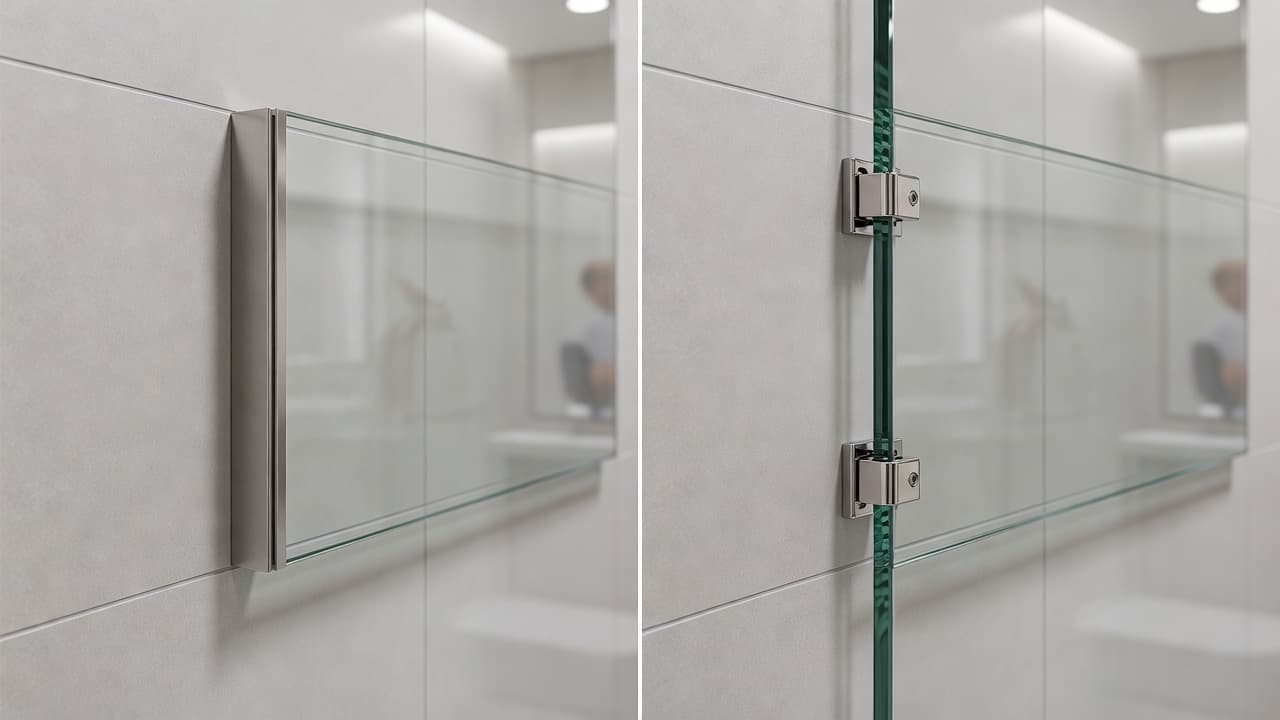
A U-channel is a continuous metal track with a groove. The glass slides into that groove, usually along its bottom edge, wall edge, or both. The channel can provide support across much of the panel's length. Installers anchor it to the surface, place the glass inside, and apply an appropriate sealant around the joint.
Clips work differently. Instead of supporting the entire edge, they hold the panel at selected points. Each clip attaches to the wall or floor, and rubber or plastic liners protect the glass inside the fitting. A larger panel may need several clips, depending on its dimensions and the manufacturer's requirements.
In a sound installation, the anchors and hardware carry the panel's load. Silicone seals gaps, limits water movement, and helps reduce minor vibration. It shouldn't act as the only structural support for a heavy glass panel.
The wall behind the tile also matters. A clip or channel attached only to weak drywall may loosen over time. Installers need to locate studs, blocking, masonry, or another suitable structure before drilling. They must also protect the tile and avoid putting pressure on the glass edge.
Silicone helps seal and cushion a shower panel, but properly placed hardware and solid anchoring provide the main support.
Glass preparation is another important detail. Tempered shower glass receives its holes, notches, and edge work before tempering. Once tempered glass has been processed, an installer can't safely drill or cut it on site. Accurate measurements must happen before fabrication.
U-Channels and Clips Compared
Both mounting methods can work well, but they create different results during a bathroom renovation. The table below shows the main differences homeowners usually notice.
| Feature | U-channel | Clips |
|---|---|---|
| Support style | Continuous support along an edge | Support at separate mounting points |
| Visual effect | More visible metal along the glass edge | Cleaner, more open frameless appearance |
| Wall tolerance | Can help manage minor surface variation | Requires accurate, stable mounting surfaces |
| Cleaning | Adds a channel edge that needs attention | Fewer long metal surfaces to clean |
| Installation needs | Careful leveling and sealing | Precise drilling, spacing, and alignment |
| Typical design use | Base, wall edge, or semi-frameless layouts | Frameless fixed panels and minimalist designs |
A U-channel often makes sense when the panel needs support along its base. It can also help hold a panel against a wall or curb where a continuous track suits the design. Because the channel spreads contact over a longer area, it may feel more substantial under the hand.
That extra metal changes the appearance. A finished channel can match the rest of the bathroom hardware, but it remains more noticeable than a small clip. Water, soap residue, and mineral deposits can also collect along its edges if the channel doesn't drain and seal properly.
Clips keep more of the glass edge visible. That open view works well in a compact Fort Myers bathroom where you want the shower to feel larger. Clips also give the glass a more custom, floating appearance, especially when the hardware matches the faucet, hinges, and towel bars.
However, each clip concentrates support at a small area. The installer must place the clips correctly, use the proper liners, and avoid over-tightening them. A clip that sits out of alignment can place unwanted stress on the glass or leave the panel slightly loose.
The difference isn't simply appearance versus strength. A channel may suit a long base edge, while clips may fit a panel with a clean curb or a wall that has a well-positioned stud. Your installer should choose based on the panel's actual design rather than applying the same hardware to every bathroom.
What Should Homeowners Choose?
Start with the shower's layout. A narrow fixed panel beside a door may look best with clips because the hardware keeps the glass visually open. A wider panel that rests on a curb or extends across an uneven transition may benefit from a channel.
Wall and floor conditions are just as important. Tile can look flat while the surface behind it contains dips, uneven grout lines, or weak backing. A channel may hide a small amount of variation, but it still needs a level installation surface. Clips need accurate contact points, so the installer must account for the tile thickness and the structure beneath it.
The panel's size and shape also guide the decision. Tall or wide glass panels create more leverage when someone pushes the edge. The installer may recommend additional clips, a channel, a support bar, or a different panel arrangement. Hardware isn't selected by appearance alone.
Consider maintenance before choosing a finish. A continuous channel has more metal to wipe, and its corners need regular attention. Clips have fewer surfaces, but the areas around each fitting still need cleaning. In Southwest Florida, hard-water residue can become more noticeable on dark finishes and glass edges, so a simple squeegee routine helps with either system.
Your preferred style matters, too. Chrome, brushed nickel, matte black, and other finishes can change how visible the hardware looks. Clips usually create the most minimal appearance, while a U-channel can coordinate with a semi-frameless design.
Homeowners in Fort Myers, Cape Coral, Bonita Springs, Estero, Naples, Lehigh Acres, and Punta Gorda can review custom bathroom shower enclosures before deciding. A glass professional can compare the hardware with your tile, curb, door swing, and available wall support.
Ask these questions during the estimate:
- Where will each anchor attach?
- Does the wall contain a stud, blocking, or masonry at the mounting points?
- Will the channel sit on the curb, floor, wall, or more than one surface?
- How will the installer protect the glass inside each clip?
- Which hardware finish will be easiest to maintain in this bathroom?
Clear answers matter more than choosing the hardware that looks smallest in a product photo.
What Professional Shower Panel Installation Includes
Good shower panel installation begins with an on-site measurement, not a guess based on rough opening dimensions. The installer checks the wall angle, curb slope, tile thickness, floor level, and nearby door clearance. Those details determine the final glass size and hardware position.
Next, the glass shop fabricates the panel to the approved measurements. If the design needs holes, cutouts, or polished edges, the shop completes that work before the glass receives its tempered safety treatment. This step prevents unsafe field modifications later.
During installation, the crew marks each mounting location and drills through the tile with suitable equipment. The anchor type must match the material behind the finished surface. A fastener in a stud or masonry provides a different hold than one placed in hollow drywall.
For a U-channel, the installer checks the track before setting the panel. The channel must sit straight and level, with appropriate cushioning between the metal and glass. The panel then receives careful alignment and sealing.
For clips, the crew positions each fitting so the panel rests evenly. Gaskets protect the glass, while the screws receive controlled pressure. Tightening a clip too much can damage the panel, so the hardware should feel secure without crushing its liner.
After the glass sits correctly, the installer checks movement, clearances, door operation, and water exposure. Sealant goes in the areas required by the design, but drainage paths must remain open where the system needs them. The bathroom should follow the sealant manufacturer's cure time before regular use.
A professional also checks the finished edges and hardware for contact points. Glass shouldn't rub against tile, metal, or another panel. Doors need enough clearance to swing without striking a fixed panel or wall.
Local experience helps when a project includes older homes, remodeled bathrooms, or tile installed over different substrates. A licensed and insured glass company can identify those conditions before fabrication, which reduces the chance of ordering a panel that won't fit.
Keeping the Hardware and Glass Secure
Once the enclosure is installed, basic care protects both the glass and its mounting system. Use a squeegee after showers to reduce mineral deposits. Clean the glass with a product suitable for the coating and avoid abrasive pads that can scratch metal finishes or glass surfaces.
Pay attention to changes in movement. A panel that begins to rattle, shift, or contact the tile needs inspection. Don't try to tighten clips or remove channel seals without knowing how the glass is supported. A fixed panel can become unstable if someone loosens the wrong fitting.
Check the sealant as part of regular bathroom cleaning. Cracks, gaps, mold growth, or separation around the channel can allow water behind the hardware. Replacing worn sealant early is easier than repairing damaged backing or tile.
Keep heavy objects away from the panel edge. Towel bars, baskets, and shower accessories should attach to approved surfaces rather than pressing against the glass. Even tempered glass needs protection from concentrated impacts at its corners and edges.
If a panel cracks or breaks, keep people away from the area and contact a glass professional. Don't attempt to reuse damaged hardware with a replacement panel until the mounting points have been inspected.
Conclusion
U-channels and clips can both keep a fixed shower panel stable when the hardware, anchors, glass, and substrate work together. Channels provide continuous edge support and may suit long bases or less uniform surfaces. Clips show more glass and create a lighter appearance, but they demand precise placement and solid attachment points.
The right choice begins with the bathroom itself. During a professional shower panel installation , measurements, wall support, panel size, water exposure, and cleaning preferences should guide the decision. When those details receive proper attention, the finished enclosure feels secure instead of fragile, whether you choose a channel or clips.